Chinamart Special Snorkel Install

Nissan Navara Forum

Help Support Nissan Navara Forum:

This site may earn a commission from merchant affiliate links, including eBay, Amazon, and others.

YBOD

Member
Joined
Oct 13, 2012
Messages
389
Reaction score
2
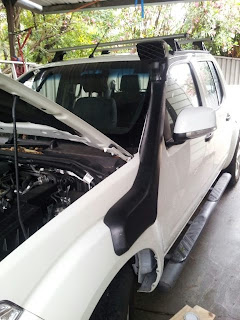
Not being willing to pay $450 for a brand name snorkel I decided to buy myself a china special like this one:

www.ebay.com.au/itm/Nissan-Navara-D40-Pathfinder-R51-4X4-4WD-Snorkel-2005-2009-Spain-/150981469800?pt=AU_Car_Parts_Accessories&hash=item2327326668

which arrived on Thursday which set me up for what I will be doing this weekend. In unpacking all the parts and reading the instructions I was amused to find that rather than the usual "don't start this project until you have read all instructions etc etc". Instead the only instructions were printed on the side of the cutting template which said "If you aren't used to installing snorkels this is not the product for you". Gotta love it.

Anyway, inspired by some of the really god write up's on the DIY projects here on the forum I thought I'd share some step by steps on how I fitted mine. Now I am no expert on snorkels, so this could turn out to not be the product for me and this thread could end with me buying a new front passenger side wing from Nissan. Lets hope not.

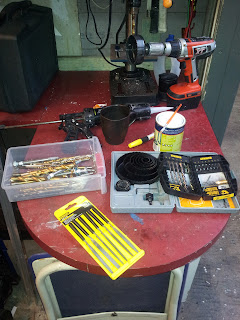
Here are the tools I used (so far):

20130119_190936.jpg


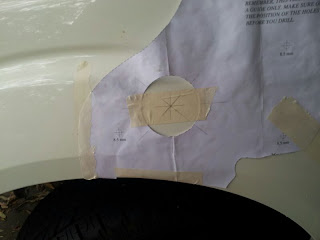
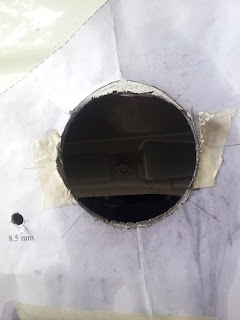
So the first step was to make the hole in the wing. I first cut out the template and taped it to the wing. You'll note that I also cut out the 90mm circle where the snorkel is going to go. This wasn't labelled to be cut out because the template indicated you should drill through the template. However I figured this way I can make the spot for the drilling without tearing the template apart:

20130119_154038.jpg


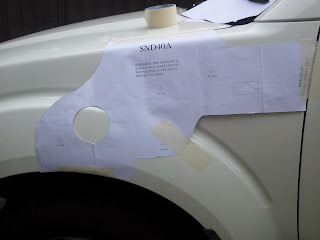
I also drew four lines on the template which lined up with the center of the drilling before cutting out. I then put a piece of masking tape in the cut out and marked this. The masking tape then prevented the drill big from sliding around when drilling the hole:

IMG_201301211949.jpg


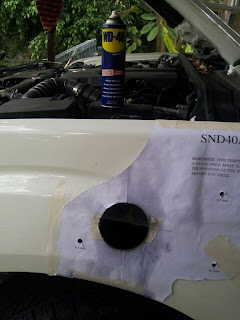
I then used a 6mm drill bit to drill a pilot hole before going in with the circle cutter. I had my trusty workmate (the wife) on hand to spray on copious amounts of WD40 to lubricate the cut, stop it getting to hot and also kept the cut clean(ish):

IMG_2013012135781.jpg
 
Last edited:
As you can see the cut is pretty rough and ragged:

20130119_180213.jpg


so i then used a set of needle files to smooth off the edge until the whole cut surface was smooth to the touch and all burs removed both on the outside and inside face. This is not only because I am an anal perfectionist but also because otherwise paint won't stick to the sharp edges and therefore will rust in future. I then gave the whole area a good clean with car wash and wax both to clean the cutting dust away but also because once the snorkel is installed this area won't be getting cleaned again very easily.

Next step was to paint all the exposed metal with two coats of metal primer and a coat of white paint. I used Dulux Rest-stop primer and some old white car paint (colour match didn't matter because you won't see this area once the snorkel is on:

IMG_201301212819.jpg


That is as far as I have got today as I want to leave the paint to dry over night before proceeding to ensure it doesn't get rubbed off during installation.
 
Last edited:
Ok so its a new morning and the paints dry and so the simple job of assembling the snorkel progresses right? Well, almost. First step is to take the airbox out (that's this bit:)

IMG_2013012137770.jpg


Now taking the box out the highlight bit of foam is the part that sits against the hole in the side of the engine bay therefore this is the point the snorkel needs to connect to.

Skitch(1).jpg


I know there is a lot of talk about how you need to go all the way to the air box and remove this pre-filter section and connect the snorkel at the point I have labelled with an arrow in order to make it 100% waterproof. However to be honest this was in the too hard box for this project because of the way the pre-filter connects to the box so for the time being I am aiming for the square shaped pipe at the foam face. I'll come back to the pre-filter later.

So taking the air box out I then bolted on the snorkel to see what space there was in the wing and to see how all the parts fitted together. Looking at all the bits delivered in the snorkel box and the air box I could only guess it went together like this (the instructions give you no clue on this):

Skitch(2).jpg


Now the problem is that inside the wing this is the space I have available:

IMG_2013012140539.jpg


What you are seeing here on the right is the end of the snorkel poking through the wing from outside (through the 90mm hole I cut) and on the left is the soft silicone "dog leg" pipe from the air box (labelled A above). As can be seen the silicone pipe faces the wrong direction completely for the hard plastic dog leg pipe to be able to connect the snorkel to the air box.

After a cup of tea (I know it should have been beer but what can i say, I am a pohm) and head scratching I worked out that at point "A" there were too many bends and if I could connect the end of the hard pipe to the end of the air box (missing out the silicone pipe) this would be ideal. Problem was that the size and shape of the two pipes didn't even come close to matching and there is no room in there for and adapter of any kind so what to do....
 
Are you sure you're not supposed to remove "b" completely and run the new silicone pipe all the way to the air box? In the photo of the pipe connected to the air box it looks the right way, but if you look at the bends maybe it removes the pre filter pipe too? I dunno though, I don't have a d40...
 
So thinking about it logically the hard dog leg pipe connected to the snorkel just fine but ideally the other end needed to be flexible so that it could connect to the pipe from the air box so a simple solution: hack it up!!

So I cut the end of the hard dog leg leaving the connection to the snorkel with a ninety degree bend and a straight section:

IMG_2013012139850.jpg


I then connected a ninety degree soft silicone bend to the end of this pipe with an opening to match the air box pipe:

IMG_2013012139150.jpg


I then used lots of www.supercheapauto.com.au/online-store/products/Sikaflex-227-Adhesive-310ml-Black.aspx?pid=11079#Cross to glue the two together and let that cure completely before proceeding to make sure it was strong before a started jamming in into place (another cup of tea break).

So now I can connect the pipe to the snorkel inside the wing:

IMG_2013012136530.jpg


and from this I then have a flexible silicone pipe poking through into the engine bay onto which I can attach the air box. Unfortunately I didn't get a photo of this bit and I not taking it all out again because this took so much swearing and cursing to get it in that I don't want to repeat in a hurry :sorry3: 
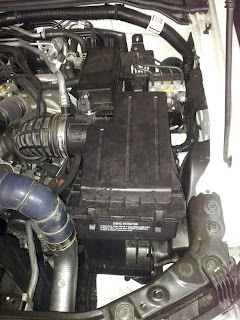
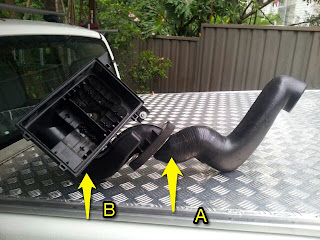
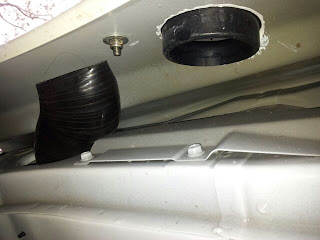
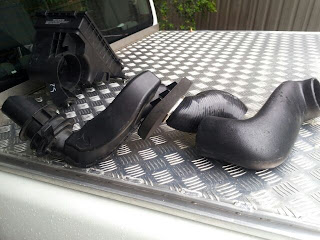
so you'll have to take my word for it. The connection between this flexible pipe to the air box with another liberal amount of Sikaflex and a jubilee clip. The best way to get to the jubilee clip is from the wheel arch side rather than the engine bay as there isn't enough space in the engine or flexibility in the pipe system.

So now the air box is back in and the snorkel fully installed. Last step was to tighten up the bolts holding the snorkel to the wing and the bracket on the window pillar but I haven't bothered doing step by steps for this as I'm sure you can work out bolts yourself.

And so while I don't have a brand name on my snorkel and it took a bit of adaption to make it work but I do now have a snorkel which does the job and only cost me $99 for the snorkel and $19 for the additional silicone bend. Result in my book.
 
Last edited:
And here it is installed:

IMG_2013012135908.jpg


I have just realised that I need to add an acknowledgment here. I have a 2012 D40 and the snorkel I bought was for a 2005-2009. The Ebay trader did confirm this with me and made it clear that it may not fit the D40 but for the $99 price I was willing to take a chance and with a bit of adjustment it worked. The snorkel itself is fine and confirms to the bodywork shape. It was only the fact that the air box is different that caused the problem.
 
Returning the issue of air tightness of the snorkel through to the air box. There is very good discussion http://www.navara.asia/showthread.php?t=13857&highlight=fitting+snorkel and I can see entirely the point that it is best to make airtight all the way through. However on the 2012 (and maybe others) the connection between the pre-filter and the air box is a twist lock "thingie" which you can see in this image:
IMG_2013012142378.jpg


As a result if I took flexible hose or any other sort of hose all the way through to the air box then I couldn't make a connection to the air box. I therefore decided to keep the prefilter in place and not worry about it for the time being on the basis that I have massively improved the protection against water getting in to the engine. For water to get through to this prefilter the engine bay would need to be entirely submerged. If this was the case I'd probably have much bigger things to worry about. I may in future decide to sort this last part out, but for the time being I'll live with it.
 
Are you sure you're not supposed to remove "b" completely and run the new silicone pipe all the way to the air box? In the photo of the pipe connected to the air box it looks the right way, but if you look at the bends maybe it removes the pre filter pipe too? I dunno though, I don't have a d40...

I think you are right for the 2005-2009 for which this snorkel is intended but the silicone pipe doesn't reach the air box with the prefilter removed and also there is no "snub" on the air box to connect the silicone to.
 
Well done, fitted mine was about $700 odd at the stealership and I bet its still not sealed properly its something I still have to check.
 
I think you are right for the 2005-2009 for which this snorkel is intended but the silicone pipe doesn't reach the air box with the prefilter removed and also there is no "snub" on the air box to connect the silicone to.

Fair enough, I didn't see that post until after I typed mine, lol. Nice job, as long as its sealed that's the main thing...
 
Just been asked a question, is the Sikaflex 227 sensor safe. Now given that it is an automotive sealant and commonly recommended for use in these situations I presume so. However reading the label it doesn't mention that it is or isnt.

Anybody any idea? Have I just filled by sorkel with evil that is going to wreak havok throughout my Nav?
 
Bloody hell ;i wish i was more computor savy,i would not have asked those stupid
questions,i can see now how people get upset with new thread starters,have been
going over old posts most of my questions have been thrashed to death,guess some of you old posters wiil have to forgive us newbees Cuz
 
And here it is installed:

IMG_2013012135908.jpg


I have just realised that I need to add an acknowledgment here. I have a 2012 D40 and the snorkel I bought was for a 2005-2009. The Ebay trader did confirm this with me and made it clear that it may not fit the D40 but for the $99 price I was willing to take a chance and with a bit of adjustment it worked. The snorkel itself is fine and confirms to the bodywork shape. It was only the fact that the air box is different that caused the problem.
I'm in the se situation. Wrong snorkel same truck different set up. I already hacked my pre-filter up though. Wish I seen this a couple months ago
 
well done.
how does the quality of the plastic snorkel seem?
 

Latest posts

Back
Top